…
Click here if you want to see the post, I made it a long time ago, and it's rather controversial. There ARE definitely be good car designs that don't have the lineflow that's described here. I won't be deleting this. But uh, take it with a pile of salt.
NOTE: Work-in-progress (This post will be updated)
DISCLAIMER: A lot of this is aimed at beginner automationeers, there are plenty of designs that work well and don’t have a 100% flow. The kind of design you want to use varies strongly on the body shell you pick
Proportions, Placement, Period-correctness & Fixture Flow (Mid 2000s Sporty Japanese Hatchback)
In this guide, I will go over the three Ps that are very important in designing a good, realistic looking car. For this and the next few detailing guides, I will be going through the steps of creating a Mid-2000s Economy Hatchback; I will later go through these steps for designs from other time periods as well (The 1990s and 1980s specifically, as these are the eras I am most familiar with.)
STEP 1: “The Three-Element Wonder” (Front Fascia Design Basics)
When designing a car, you’ll want to start by layout out the basic major elements for your design.
First, let’s take a look at the original Suzuki Swift that the Automation body shell is based on:

You will see that the front end Consists of 3 basic elements.
-
The headlights, a design triangular design consisting of flowy lines with a with rounded points. A very common design at the time on angular-styled cars from Japan. (For comparison, a 2005 Honda Civic, a 2005 Nissan Tiida, however it can also be a square, as seen on the 2005 Toyota Auris)


Also note, that for each one of these cars, the orientation of the shape is different as well.
The swift has the flat end of the triangle on the bottom, the civic has a wedge-shaped triangle with a near 90-degree corner and the Tiida has the flat side of the triangle on top. Since the Swift has the flat side on the bottom end, I will be aiming for a similar design, but not exactly the same. -
The Bonnet/Hood Grille & Bumper Grille.


Aside from the badge, there is mostly an absence of chrome, it has a mesh insert, mesh grilles are usually considered sporty and youthful. Since the center of the Bonnet/Hood is extruded on this car, a design connecting the grille to the taillights (as seen on the Tiida) is not recommended as it will end up looking strange and works better for cars with flat bonnets/hoods. A Design like the one on the Auris would work, were it not that the Hump with the Logo on it can’t be recreated in automation (well, it can, but the logo would be flat, making it less emphasized)
The bumper grilles usually follow either a rounded or edged rectangular look to them and chrome is (almost) never present here. Note that they usually leave enough space on the bumper to fit a full European spec license plate, if not at least the top half is mountable. -
The side bumper vents.


On the Swift, it is a separate element and a continuation of the angular, rectangular shape. It is not always a thing however, the Civic and Tiida instead have a Widened bumper grille and on the Auris the shape is contrasting to the center. The side bumper vents are usually also a mounting point for optional foglamps (on mid-to-high end trims) and are not always open, sometimes they’ll be blocked off by a plastic insert. They do almost always stay on the same height as the center bumper grille.


Now that we know the 3 major elements in the front fascia, It is time to do some concept designs. The image below contains a few examples of possible designs you could make using the Suzuki Swift Bodyshell, going from conservative designs to some more experimental one, the final one being something to avoid:

NOTE: Proportions not final.
I’ve dissected all the above designs to show you what is and isn’t fitting for the type of car we’re working with. The swift has a lot of line work that flows out to the A pillar, You should always try to work with the lines of the body shell, these are fixed elements that can’t be changed (or very little with the use of Morphs) and working with them and making everything flow nicely will result in a realistic and balanced design. There are of course always exceptions, and sometimes going in the opposite direction with fixtures will work, but most of the time it will look off somehow.
Once you’ve placed your Headlights, grilles and vents and are happy with the fixtures you’re using, it is time to move on to the next step. Do not worry too much about Proportions yet, we will go over that in a few steps.
STEP 2: “Balancing the sides” (Rear Fascia Design Basics)
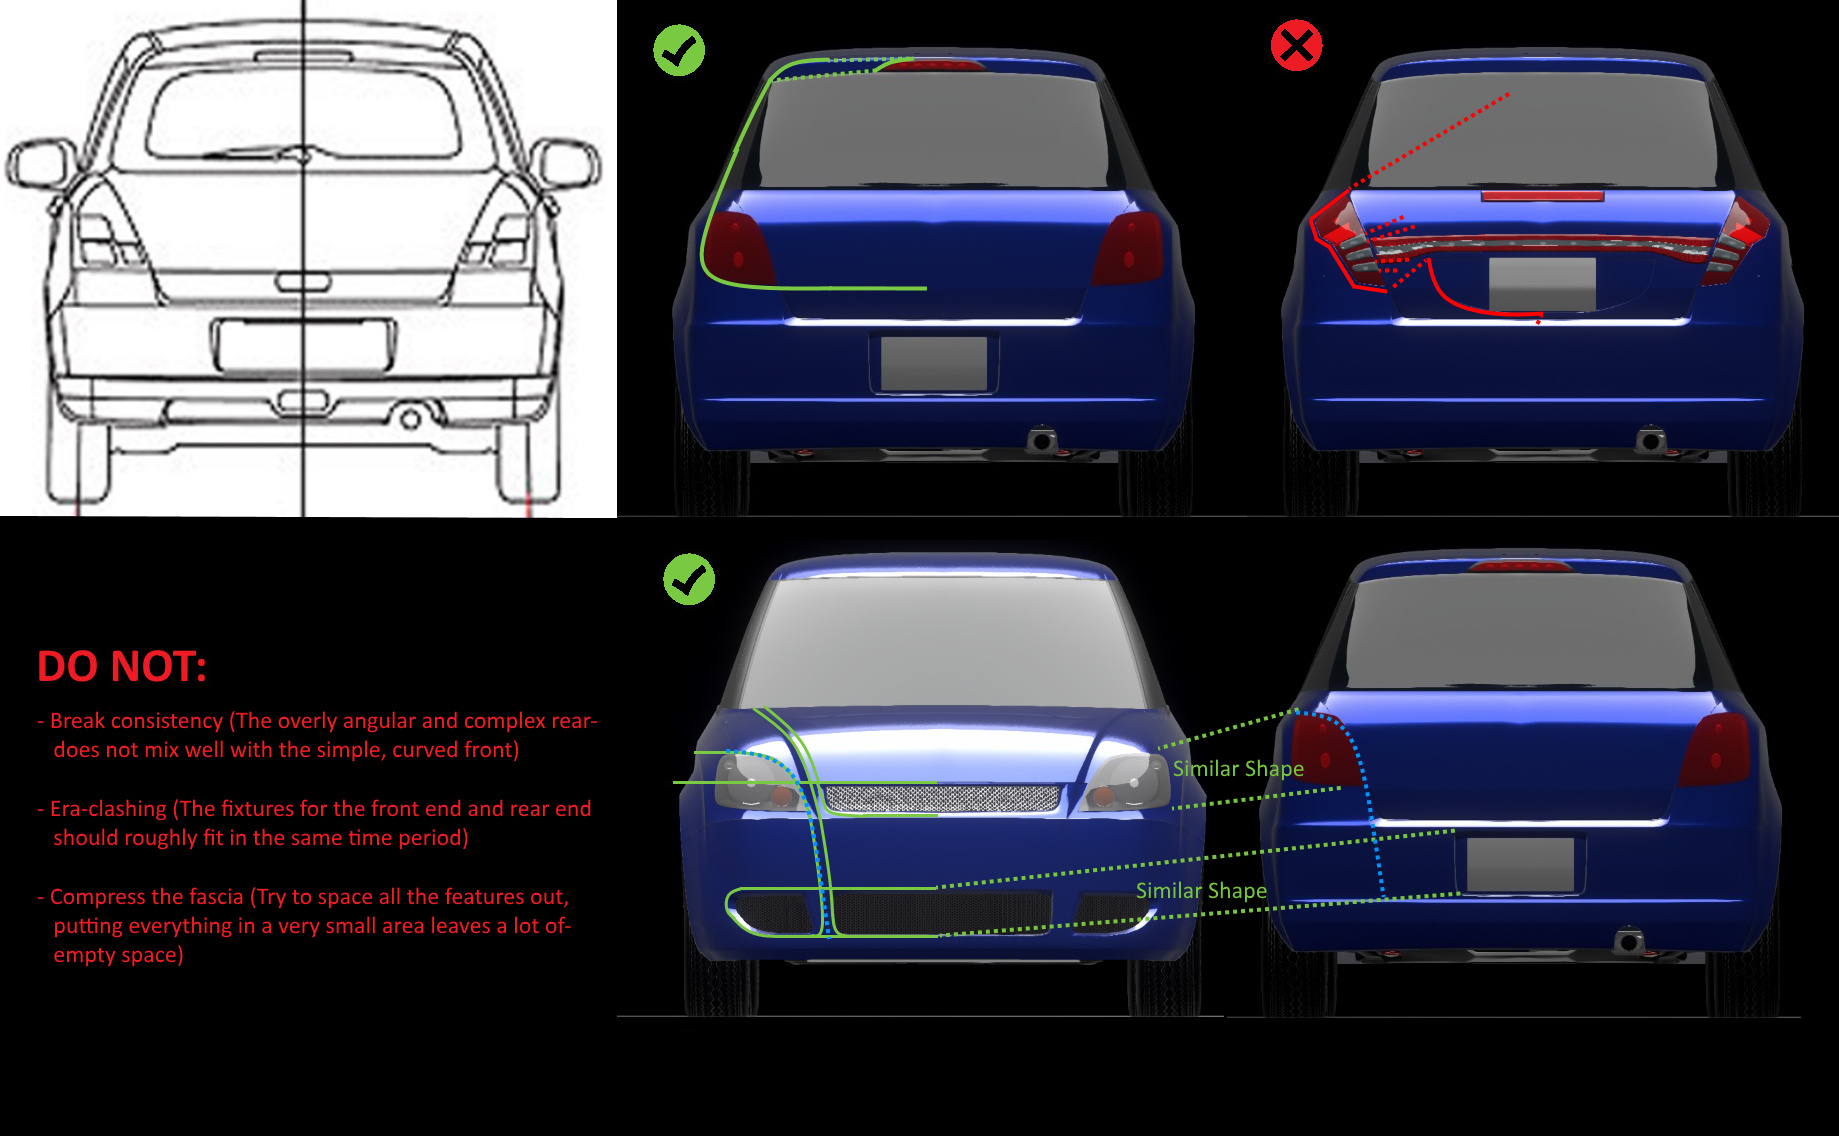
An important rule when it comes to doing the Rear Fascia (Or the front if you started with the rear end of the car), is making it Consistent with the front end of the car. Let’s take a look at the rear end of the Suzuki Swift and find the Main design elements:

The rear end contains roughly as many as the front end.
- The Taillights
Including 3rd brake light, which is mandatory in this era for all markets, and rear Foglight, which is mandatory if you want to make a car for the European market
If you look at the Japanese Domestic Market swift below, you will find that it does not have one, and that the bumper is shaped differently in comparison to the UK market version posted above.
-
The License Plate Surround
-
The Trunk Handle
-
The Exhaust
[TO BE CONTINUED…]
Anyways, If I decide to contribute to this thread any further, it will be in the form of How-to tutorials for detailing, rather than me attempting to yell at your from a distance because your headlights are .1nm to large.