Part 1: A guide to the designer
So, first of all, what does everything in the engine designer actually mean? Let’s look at the stats first.

From top to bottom we have:
Performance index - This is a stat that shows how much usable power you have. So for example, if you’re revving your engine way past peak power, there’s likely to be a large power drop off. That power isn’t really usable, so will decrease your performance index.
Weight - This shows how heavy the engine is. You can change the units it is shown in on the main menu, but for this guide I will have mine in KG.
Reliability - This is how reliable your engine is. A good reliability score changes over the years, so just because your car only scores 40 reliability in 1946 doesn’t mean it is necessarily bad.
Throttle Response - This is how quickly your engine reacts to changes in the throttle (the accelerator pedal). A higher value is generally sportier, but less drivable.
Smoothness - This is how smooth and comfortable your engine is. A higher value means your car will be more comfortable. A smoother engine will also be more reliable.
Loudness - This is how loud your engine is. A louder engine will be sportier, but less comfortable.
Required Cooling - This is how much much cooling your engine needs to stay reliable. A higher value means your car will have more drag from all the ventilation you have.
Service Costs - This is how expensive your engine is to maintain. Higher costs will make budget buyers less likely to buy your car, as they cannot afford to maintain it.
Fuel efficiency - This is how fuel efficient your engine is in a certain RPM range (I’m not 100% sure what the range is, but I think it is something like 2000RPM to 3000RPM). While a higher value tends to mean greater fuel economy, this isn’t always true. For example, larger engines tend to use get more power without using too much more fuel (So are more efficient), but will still get worse fuel economy.
Octane - This is your engine’s octane, measured in either RON or AKI. I will go into further detail in the fuel section of this guide, but for now all you need to know is that this number should either match or be slightly below the number next to your fuel choice. You can change your units in the settings on the main menu, but in this guide I will be using RON.
Emissions - This is how harming to the environment your engine is. A lower value will mean it is less harming. At some point (I assume in the lite campaign), this will affect the tax bracket your car is put in, although for now has no effect.
Material Costs - This is how much it costs in total to build your engine.
Production Units (PU) - This is how many man hours it takes to produce your engine. This will be important in the lite campaign, as have a lower number means you can produce more engines for your cars quicker.
Engineering Time (ET) - This is how many months it will take to engineer your engine. This will be important in the lite campaign, as a lower engineering time will mean your car will be developed quicker and can be sold sooner. Engineering time can be brought down with familiarity.
In the middle on your screen is your dyno graph, or a torque curve. The blue line shows power (in my case, horsepower (hp)), and the red line shows torque (lbs-ft).

This is kinda tricky to explain, but in short power is the one that matters, as it is torque multiplied by RPM. A sporty car will have power and torque increase with RPM, while a more drivable car will have a flat torque curve that slowly trails off, and a smooth power curve that flattens out.
If you press the arrows above the graph, you can view a few different graphs that show efficiency and boost (if you have a turbo).

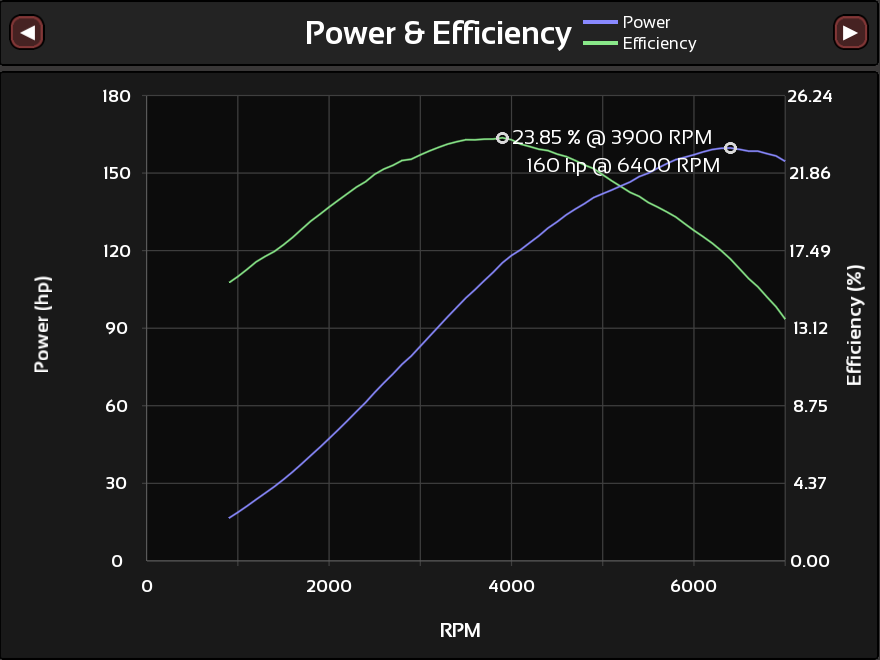

Don’t mind this terrible turbo setup, I just threw it onto this engine for demonstration purposes
This is good for if you are fine tuning economy, but if you are starting out you can mostly ignore this. Leave it on the power and torque page for now.
On the right you have six green squares. These squares show some things that may be affecting your reliability significantly. If they are not green, you should probably check out the problem.
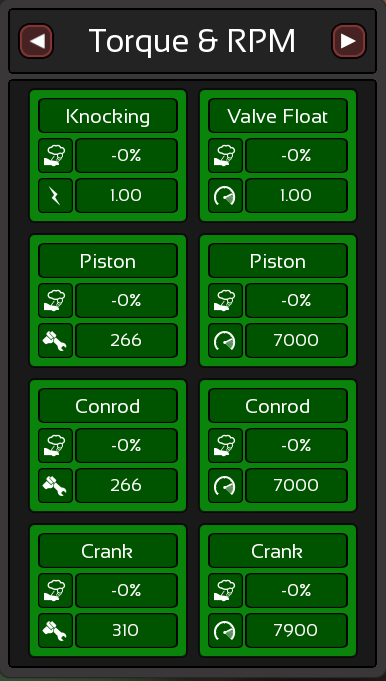
Knocking - This is when your octane rating is higher than the fuel you are using. Lowering compression or boost pressure is the easiest way to fix this, but you can also richen the fuel mixture, lower ignition timing or increase your cam profile.
Valve float - This occurs when you are revving your engine further than the valvetrain can handle. Ways to solve this is to lower the RPM Limit, change the head and valves (valvetrain), decrease your bore or increase the cam profile.
Piston, conrod and crank (left) - This happens if your engine is producing more torque than your internals can cope with. The number under the percentage shows the maximum torque your components can cope with. To solve this, change these components in the Bottom End tab, or reduce torque until it is under that number.
Piston, conrod and crank (right) - This happens if your pistons are revving too high. The number under the percentage shows the maximum RPM the internals can cope with. To fix this, bring your RPM limit to below the number, change the components in the Bottom End tab, or lower stroke.
If you press the arrows on the top of the Torque and RPM page, you can view the flowbench. I will explain these when they arrive in the guide, as they are much more specific to certain components.