After toying around a bit I’ve kinda figured out how to fix most common issues with lights in Automation exported cars. So I thought I might write a guide with what I discovered. Disclaimer: I’m nowhere near an expert in Beam.NG modding. I just grabbed a car whose headlights I wanted to fix, a text editor, and kinda trial-and-errored my way until it worked.
How to make lights work in BeamNG
The idea for this guide was to give an example car with some lights, that I think has at least one example of each kind, so I can fix them in this guide and you can follow along, having the same node names and everything being on the same line of the .jbeam file.
First off
So gentlemen and gentlewomen, if you look under your desks you’ll find this beam mod file:
https://drive.google.com/file/d/1M4Dz034JqHk43y2NrzDkDBhMSS-JBC90/view?usp=sharing
Right as it came out of the Automation exporter. To have this magnficent car in BeamNG, you have to place it (as is, without decompressing) in yout Beam mods folder. Default is Documents/BeamNG.drive/mods.
When you open the .zip file go to vehicles/elmenduko_beamng_light_demonstration_hideous and you’ll find a lot of files. The one we’re interested in is “beamng_light_demonstration_hideous.jbeam”, open it with a text editor like notepad (Notepad ++ is heavily recommended as it will make your life easier, and it’s free).
What we are going to do:
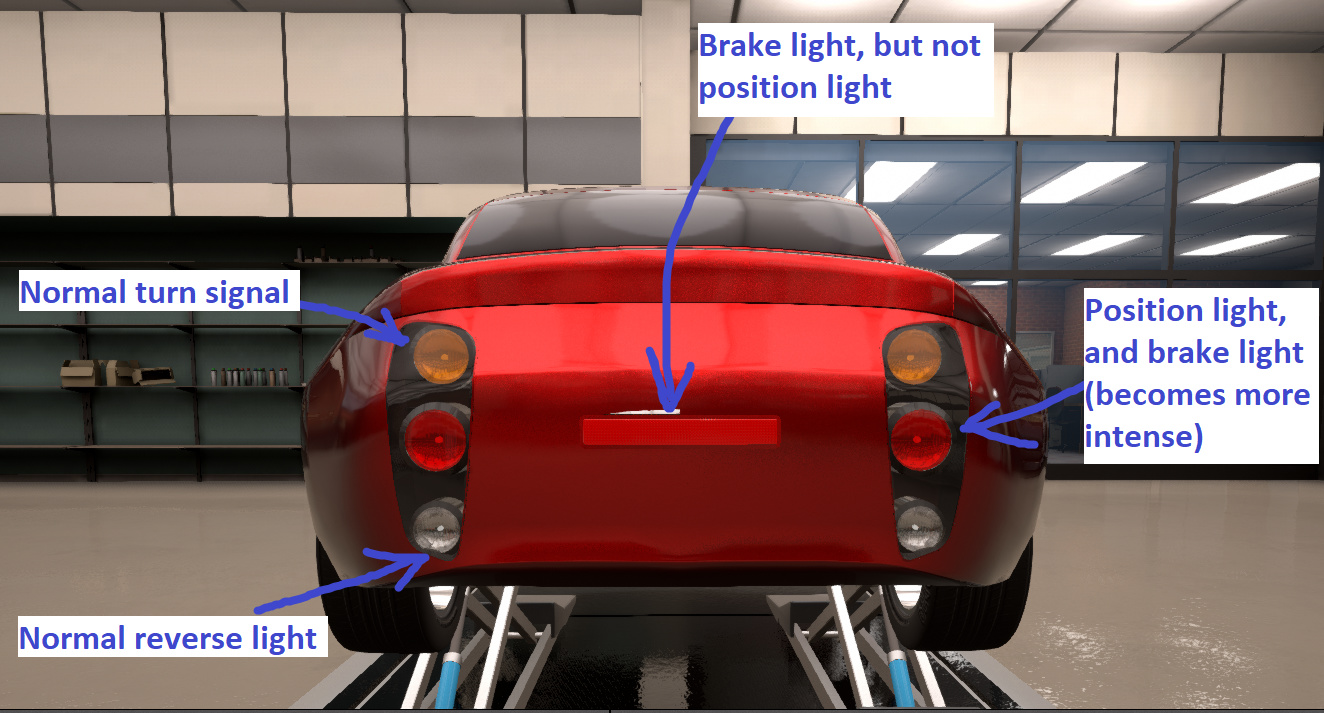
If you haven’t looked already, you’ll find a damn ugly car in beam (or if you load the .car file in Automation). It’s that way on purpose though, I made it so it has one of each kind of light I can think of to illustrate every scenario, and to have them be spaced out to make identifying which is which easier.
The plan is to make the lights behave like this:

However, if you open the car as it is now in Beam you’ll notice several common issues:
-
Headlights being extremely underpowered and not good enough for driving in the dark
-
Foglights acting as a blinker because I changed the color of the glass
-
Modular headlights cover lighting up itself… even on the rear when in reverse!
-
Foglights can’t be controlled independently of headlights
Some theory first
So, lights in Beam.NG cars have basically two parts:
Glowmap
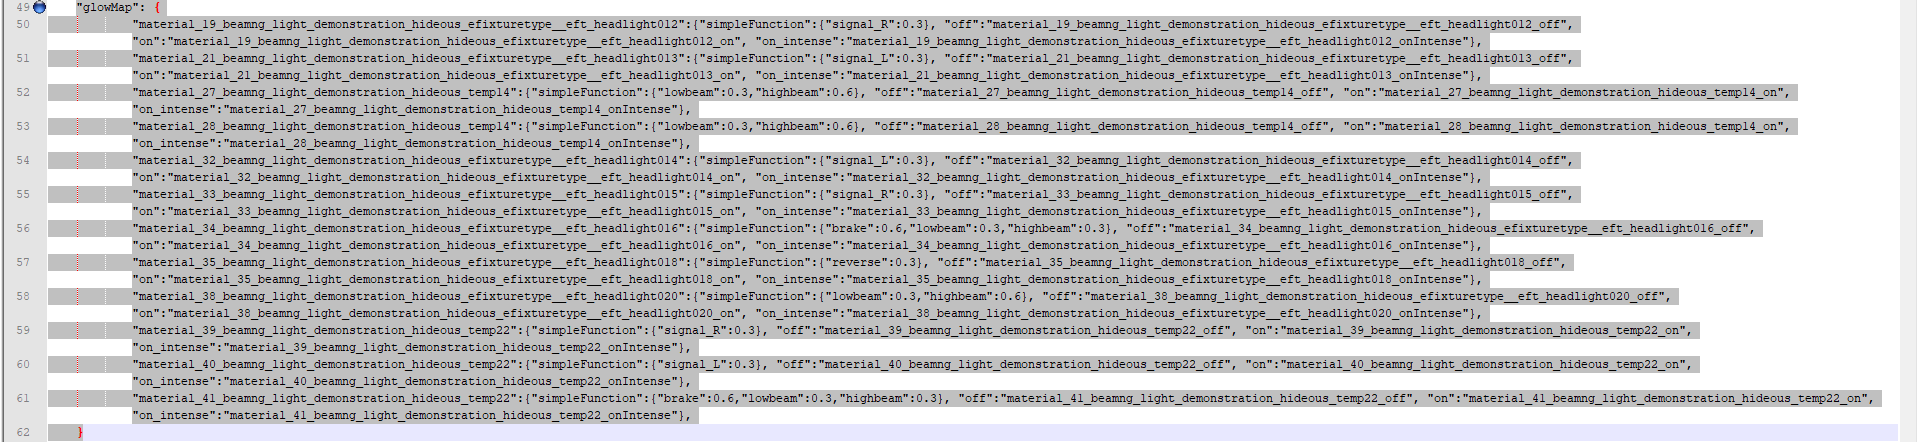
This part (line 49 on our .jbeam), allows the lights themselves to look lit when they are on, but it doesn’t actually cast light on the world or any objects. It merely changes its texture. This is most visible (and important) on position lights and turn signals for example.
Spotlight props
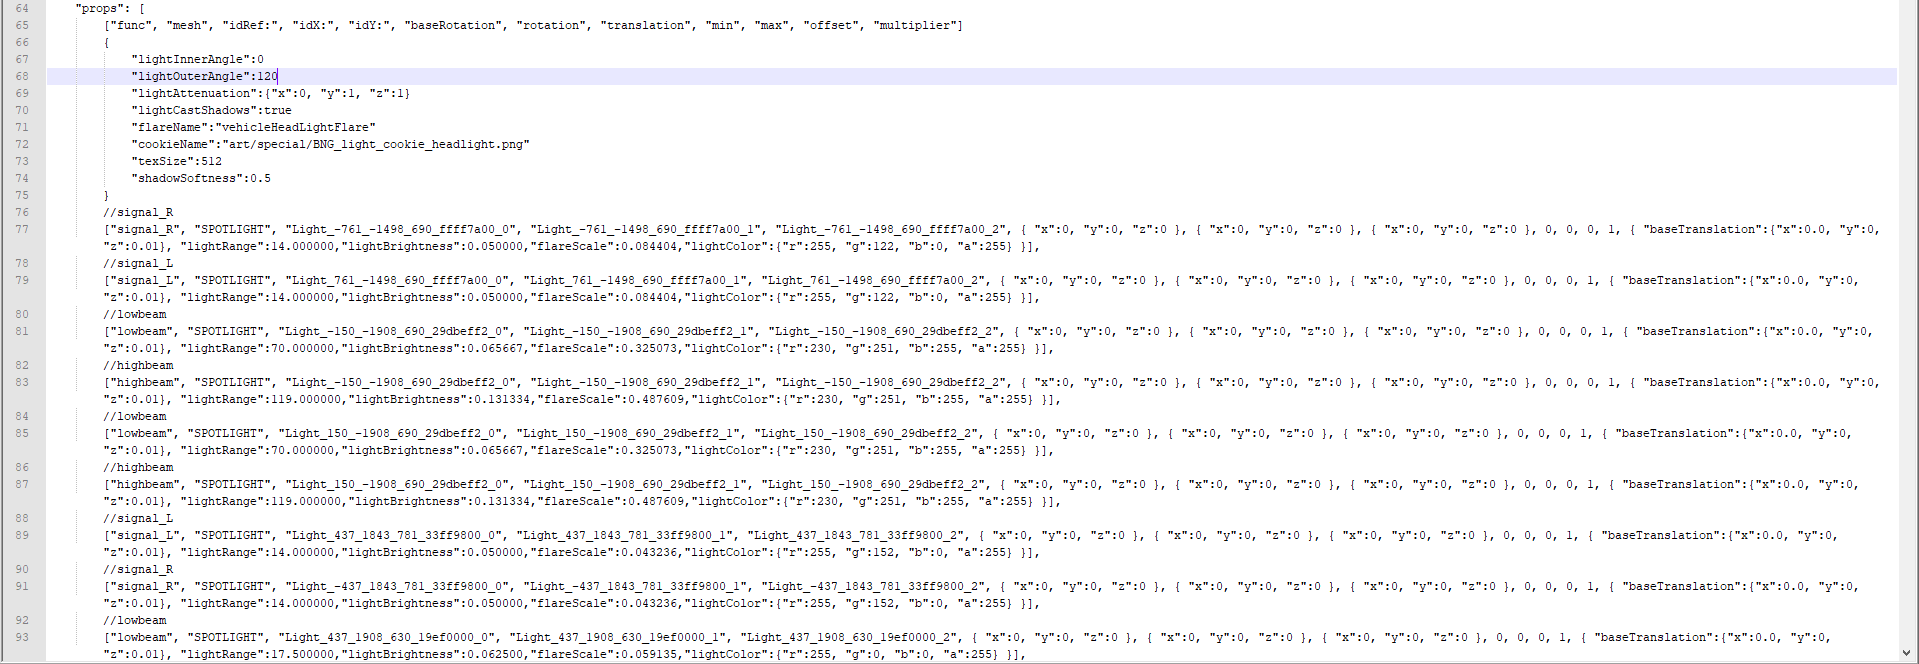
Lines 64 to 132 (after the Glowmap stuff), we have a list of the spotlights. Spotlights are a subtype of prop, but they’re the only props automation exported cars have. Spotlights are the actual light casting part, they produce a cone of light and a flare where they are.
So for example
The first part here has some general properties that will apply to every single light on the car:
General properties, default values
{
“lightInnerAngle”:0
“lightOuterAngle”:120
“lightAttenuation”:{“x”:0, “y”:1, “z”:1}
“lightCastShadows”:true
“flareName”:“vehicleHeadLightFlare”
“cookieName”:“art/special/BNG_light_cookie_headlight.png”
“texSize”:512
“shadowSoftness”:0.5
}
- Light Inner angle: this value is the angle of the cone in which the lights have full brightness. The default of 0 might work, I sometimes increase it a notch to ~40
- Light Outer angle: value of the entire cone of light, depends on your taste. Default or a bit more seems to work fine.
- Light Attenuation: I’ve never changed that, controls how much the light is reduced with distance. Guess you could try to see how it looks, I’ve always left it at default
The rest is pretty self explanatory and shouldn’t require changing in this part
After this part, we have a huge list of all the spotlights on the body. They don’t exist by themselves though, they are attached to a node. Think of nodes as dots in a 3d canvas that is the car. If we take lines 76 and 77 as an example:
Lines 76 and 77
//signal_R
["signal_R", "SPOTLIGHT", "Light_-761_-1498_690_ffff7a00_0", "Light_-761_-1498_690_ffff7a00_1", "Light_-761_-1498_690_ffff7a00_2", { "x":0, "y":0, "z":0 }, { "x":0, "y":0, "z":0 }, { "x":0, "y":0, "z":0 }, 0, 0, 0, 1, { "baseTranslation":{"x":0.0, "y":0, "z":0.01}, "lightRange":14.000000,"lightBrightness":0.050000,"flareScale":0.084404,"lightColor":{"r":255, "g":122, "b":0, "a":255} }],
Line 76 starting in “//” means it’s a comment, what is written after that does nothing. Line 77 says that when the right turn signal is on, a node called Light_-761_-1498_690_ffff7a00_something will light up, this light will have a max. range of 14, a brightness of 0.05, generate a small flare, and be orange.
So which node is Light_-761_-1498_690_ffff7a00_whatever in the car? Well, to find out we’ll need to look around in Beam.NG.
Identifying the lights
Now, make a copy of “beamng_light_demonstration_hideous.jbeam”, put it somewhere easily accessible (don’t leave it in the .zip for now), and open it in a text editor. Making a backup is not a bad idea. Also, open up BeamNG alongisde it, and set it in windowed mode to work alongside (if your screen size allows). Load up a (preferably simple) map that has day and night available, and spawn the car.

Now, enable debug mode. For that first you’ll need to make sure “advnaced functions” are enabled in the user interface menu:

Then open debug mode in this menu and change these two settings to see the nodes and their names:

As you can see on the right, a lot of dots showed up, along with their name tags, making a huge blue unreadable mess. And this car is pretty tame compared to others. So to have any chance at telling where the nodes we’re looking for are, we’ll have to use the free camera to look around. If that doesn’t work, it’s sadly down to trial and error. Free camera mode is accessed by default by pressing shift+C. WASD and Next/Previous page to move.
The nodes we’re interested in are:
-
EFT_HEADLIGHTNN (NN being a number). Some of these have a glowmap attached (not all). And even then, not all of them will require changing. Magenta dots by default
-
Light_xxx_yyyy_zzz_somerandomletters_N. The xxx yyyy zzz seem to be related to their coordinates in the car. A pair of mirrored lights will have oppossite xxx values (so if Light_-200_blahblah is the right headlight, Light_200_blahblah is its left counterpart). You’ll normally find these in set of three, the “N” number being 0, 1, or 2. I don’t really know what this means, but for the purpose of this guide let’s just pretend the trio is one thing. Yellow dots by default
Actually Editing Stuff
Now, with the help of the free camera and the different light controls, we can find the problematic ones, and then search for them in the file. And if that doesn’t suffice, we can look around in the files, see what function they have attached, and if that doesn’t work either, it’s trial and error sadly.