Inspired by this great guide on how to build convincing classic American cars, this thread will go over how to design a good looking American classic car. (1950s to 1980s)
Some considerations:
- Remember that what constitutes a good looking car is always subjective, the only “objective” means to determine a good looking car is just a car that looks plausible in its time period (for example, you wouldn’t try to pass off a blobby 90’s sedans as a 60’s car).
- I certainly don’t see myself as a design god, and I know for a fact there are still people better than me, however having played the game for 4 years and having been in this community for about a year (on the Discord before joining the forum) I’d still like to share the tips and tricks I’ve learned during my time here.
And with all that out of the way, lets get going
So, you want to build a good looking American classic?
Lets say you’ve engineered a sumptuous luxury coupe, or a bitchin’ muscle car. They drive great, the luxury car is like a cloud, the muscle car shreds tires left and right, and overall they’re hoots to drive in their own ways. But… something is missing. Something that can only be captured in the aesthetic design of the car. Well, hopefully this guide will help you catch that special something.
General Advice
Car Size
First off, you must know what size you’re car will be. Everyone knows about giant old American cars, but, as expected, American cars, just like cars from anywhere else, existed in diverse shapes and sizes. The size of your cars depends a lot on your intentions on it, for example, you wouldn’t try to build a luxury car out of a Kei truck (a rather hyperbolic example but you get the point).
Figuring out the needed size of your car
This chart should give you some ideas of what size class your car should be for the segment you’re pursuing. Remember, the actual dimensions of these size classes changed over the years, with the mid/late 1970’s being an important time in American cars being downsized. This, obviously, should have been done at the very beginning of your engineering stage.
Pre Fuel Crisis
| Size Class | Average Wheelbases | Possible Segments |
|---|---|---|
| Compact | 2.7 m to 2.9 m | Budget, Commuter, Eco (lol), Family, Pony |
| Mid-Size | 2.9 m to 3.1 m | Pass. Fleet, Family, Premium, Muscle |
| Full-Size | 3.1 m + | Family, Premium, Luxury |
Post Fuel Crisis
| Size Class | Average Wheelbases | Possible Segments |
|---|---|---|
| Compact | 2.6 m to 2.8 m | Budget, Commuter, Eco (this time unironically), Family, Pony/Muscle |
| Mid-Size | 2.8 m to 3.0 m | Pass. Fleet, Family, Premium |
| Full-Size | 3.0 m + | Premium, Luxury |
Note: It’s very important to mention that wheelbase size is merely an approximation of the possible size class of your car. Your morphs can greatly affect your car’s size class, as size class is dependent more on length, width and internal volume of your car ¹. This is why there is some overlap in what wheelbases are considered compact/midsize/fullsize etc., as it is possible for your car’s actual body to extend far beyond the wheels, putting your car into a larger size class.
US Regulations
Believe it or not, despite being called the land of the free, car designers have to meet certain criteria of design that may or may not hinder aesthetic choices. Design choices that were regulated include:
- Headlight size, layout and type, from 1941 to 1984
- License plate dimensions (okay thats not really a car design aspect, but as long as you use a license plate fixture I’m counting it)
- Bumper strength, which affected the looks of the bumpers, from 1975 to today
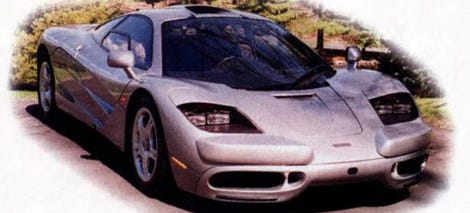
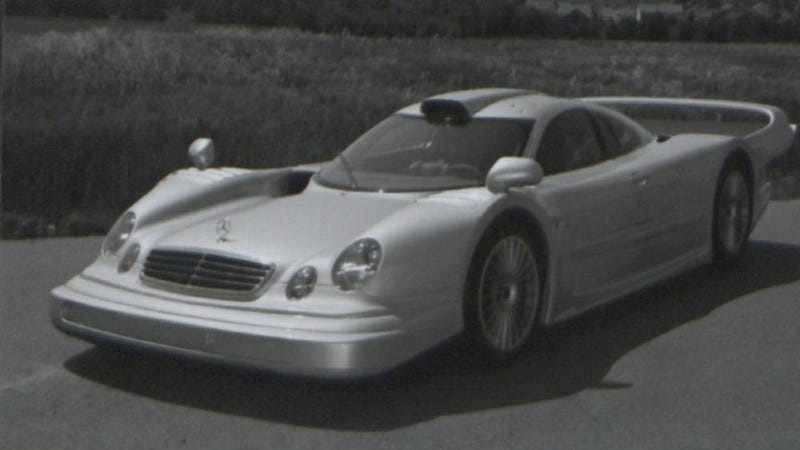
Yes, the 5 mph bumper law is still in effect, nowadays mostly only low volume performance cars are affected, such as the McLaren F1, Bugatti Chiron, Mercedes CLK. However, in nearly all modern designs you don’t have to worry about messing with giant plastic protrusions for your USDM cars
License Plate Size
Lets start with the easy stuff. The default size of the US license plate is nearly precisely the size of actual US plates (12" x 6") (its only off by a few millimeters), so…
DO NOT RESIZE YOUR U.S. PLATES
Headlights
Compare this European-spec 1978 Mercedes W123 (left) to its American-spec counterpart. What’s the most obvious difference you see?

If you said the headlights, congratulations, you are correct. While the European-spec car used composite headlights with removable bulbs (like basically any modern car), the US-spec car used sealed beam lamps. Due to being sealed, if one lamp went bad, you threw away the entire unit and bought a replacement. To help keep costs down for someone trying to fix their car, the US government decided it had to regulate the size of the sealed beam lamps to allow for headlights to be cheap and universal. As long as it was the right diameter and shape, any sealed beam lamp could fit any car. In the Mercedes W123, the US-spec headlights were a pair of dual-filament 7" circular lamps (meaning the lamp acted as both low and high beam), while the inner lamp was a fog light (just an extra light outside of regulations). Here’s the regulations over the years ²:
| Model Year | Allowed Lamp Configuration |
|---|---|
| 1941 | One pair of dual filament 7" diameter circular lamps |
| 1958 | Two pairs of single filament 5.75" diameter circular lamps |
| 1975 | One pair of dual filament 200 mm width rectangular lamps, or two pairs of single filament 165 mm width rectangular lamps |
| 1984 | Regulations on headlights abolished |
Note: The previously allowed lighting configuration would still be allowed. For example, you can still build a 1975 car with the 1941 regulation headlights (dual 7"), but you cannot build a 1958 car with the 1975 regulation lamps (the rectangular lamps)
Fun Fact: The Mazda MX-5 (NA) was the last car to use dual 7" headlamps, when it went out of production in 1997. They were concealed in pop up housings, and contributed to the overall cute look of the car.
Of course, you might be wondering, “How is this information useful to me if I don’t know how to reproduce this in Automation?”, well of course, I’ll answer how. A couple of the sealed beam headlights do a good job of following regulation size, and are pretty useful for getting proper scales easily, of course, as long as you don’t resize them.
Various sealed beam lamps, in regulation size
Clockwise, from upper left: 7" lamp, dual 5.75" lamp, 200 mm lamp, dual 165 mm lamp

7" Circular Lamps Fixtures

5.75" Circular Lamps Fixtures

165 mm Circular Lamps Fixtures
Note: For this fixture, default size is only at regulation size for the twin lamps, the single lamp must be scaled up to get it to regulated size. This is done using the tape measure fixture:
Each square on the grid is 2 x 2 cm, so you will just need to scale up the lamp to be the same width as the grid square (20 cm = 200 mm)


A Footnote on pop-up/hideaway headlights
Pop up headlights and hideaway headlights were an important staple of sportier and more prestigious American cars of the 1950s to 1980s. Aside from conventional pop-ups, as seen on the first generation Oldsmobile Toronado or Chevrolet Corvette C2 to C5, another style of headlights was prevalent on American cars known as “hideaways”. These headlights had a front cover that would retract open and fall closed, like a garage door, in front of the car’s lamps. The actual piece that covered the lamps could be made to look like the body work, as seen in the Lincoln Continental Mk.VI, or the cover could be camouflaged to look like a continuation of the car’s grill, as seen on the Pontiac Grand Prix.
Hideaway lamps fixture - with dual 5.75" lamps within

Bumpers
Bumper styling had plenty of changes during the years of car design. In the 1940s and 1950s, bumpers were very separated from the car’s actual bodywork, sticking far out. More opulent and luxurious cars had larger, chromier bumps, with bullet shapes sticking out of the bumper known as “Dagmars”. Of course, those bumpers were very good at shredding jaywalkers, so over the years, they gave way to sleeker bumpers that flowed better with the car’s styling in the 1960’s. Finally, in 1973, due to new regulations, bumpers essentially became picnic tables to protect the car’s body from any damage in case of a 5 mph impact with a wall (hence the name - 5 mph bumper). Eventually, in the mid to late 1980s, bumpers were again more integrated into the car to help improve aerodynamics and meet EPA mileage standards.
Often, 5 MPH bumpers were considered quite unsightly on a foreign import car, as those cars were rather quickly modified to meet US standards, and not designed for the giant protrusions that were old fashioned 5 MPH bumpers. One clear example is the Toyota AE86 (JDM) vs the Toyota AE88 (USDM)
Comparison (import car - AE86 Corolla)
-
AE86 USDM:

-
AE86 JDM:


Fun Fact: Dagmar bumpers are named after American actress Virginia Egnor, whose stage name was Dagmar. The name of the bumpers comes from the supposed similarity between the shape of those “bumper bullets” and the actress’s breasts.
Other Lighting
Aside from the headlights, there are also the tail lights and various side lighting that needs to be addressed. With tail lights, you have far more liberty in styling, as long as you keep in mind that ³ ⁴ ⁵:
- White reversing lights became required in 1966, prior to that they were an additional safety option
- Indicator lights as we know them were first introduced as an option in the 1940’s, in the 1950’s they would become required.
- Front facing indicators had to be amber in 1968, while rear facing indicators could be amber or red.
- Side cornering lamps were an option in luxury cars from the 1960s to 1980s, and were basically small white lamps on the front corners of the car that switched on with the corresponding side indicator (ie if you signal right, the right cornering lamp would turn on)
- Side reflectors or side marker lights were made a requirement in 1968. This would require a small amber lamp or reflector on the front corners, and a small red lamp or reflector on the rear corners.
- In 1970, the aforementioned regulation was changed, requiring both side markers and lamps, in the layout mentioned above.
- Front parking lights/position lights are usually dim orange lights, that use the same bulb as the front indicators.

Now with general styling advice out of the way, we’ll take a look at more specific examples by the decades
American Styling by the Decade
WORK IN PROGRESS